Diberdayakan oleh Blogger.
RSS

MILAGU SADAM RECIPE | BACHELORS RECIPE

Milagu -sadam
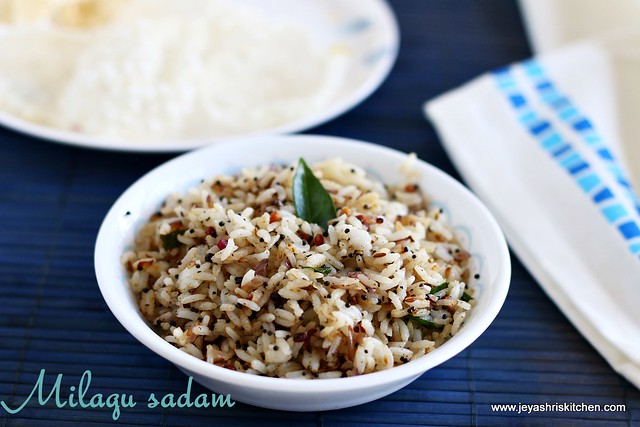
Milagu Sadam i wanted to post for a long time in the bachelors recipe series. Milagu sadam was a request by a bachelor reader too. Finally i made this yesterday. This is a very simple south indian rice variety. Being bored with parupu podi and pulikaichal, this milagau sadam will be a easy and quite flavourful one to have at home or pack it for lunch box too. No hard and fast rules in making easy bachelors recipe. Just be creative with your ideas. I have given few at the end of the post. Tryout this easy Milagu sadam| Pepper flavoured rice. For bachelors of guys who are staying away from home try out this spicy pepper rice.


Milagu Sadam

  Preparation Time : 5 mins | Cooking Time : 20 Mins |Serves: 1-2

     Rice      1/4 cup
     Pepper  and Jeera   1 tsp
     Salt    as needed
     Onion    1 (optional)
     Mustard seeds |Kadugu    1/4 tsp 
     Urad dal    1/8 tsp
     Cashew nuts   4 (optional)
     Curry leaves    few     
     Oil     1-2 tsp 


Milagu sadam
Method:
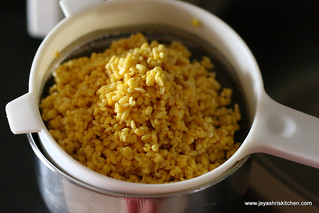
  •  Cook the rice with 3/4 cup of water and add few drops of ol while cooking. I used Par boiled rice ( puzhungal arisi). If using raw rice or basmati rice just add 1/2 cup of water only.
  • Allow the rice to cool in a wide plate.
  • If adding onion, finely chop them.
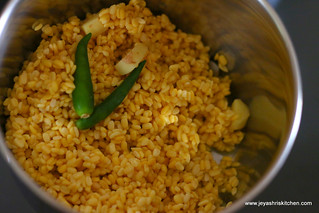
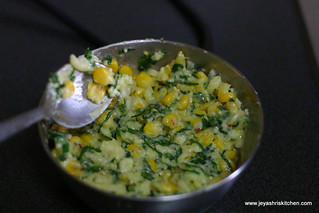
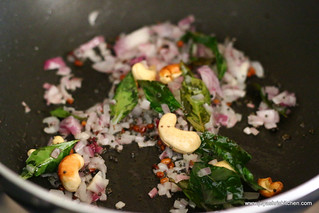
  • In a pan add oil and throw in the mustard seeds, urad dal, cashew nuts and curry leaves. Add onions to this and cook till the it becomes pink.
seasoningAdd-onion
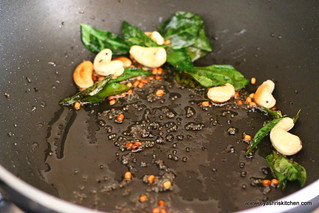
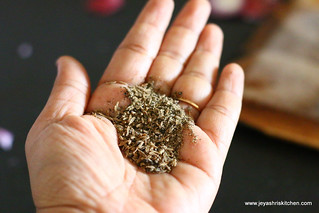
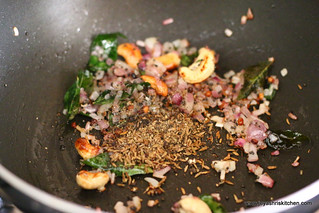
  • Pound the pepper and jeera coarsely in a mortal and pestel.  Add this to the pan. Add Salt.
coarsely pound jeeraAdd-pepper -jeera
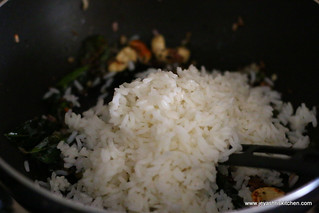
  • Add rice to this and keep the flame low. Gently mix this well. and switch off the flame.
  • If needed add few drops of ghee to enhance the flavour.
Add-ricemilagu sadam
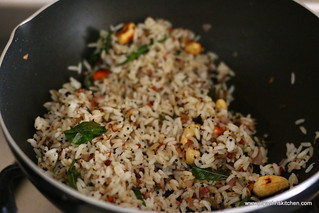
  • Milagu sadam is ready. Serve with any papad or vadam. We had with javarisi vadam.
Milagu sadam
Notes:
  1. You can add grated carrot in the last to make it colorful and healthy.
  2. Adding peanuts instead of cashew nuts will be nice too.
  3. Even boiled green peas can also be added to make it colorful and healthy.

  • Digg
  • Del.icio.us
  • StumbleUpon
  • Reddit
  • RSS

YOGURT DIP RECIPE | SUMMER RECIPES

Yogurt-dip
Generally yogurt dip will be made with greek yogurt. But in normal Indian homes buying greek yogurt and making it at home will be bit out of question of turns out expensive too. Greek yogurt dip will be very thick and creamy and will be perfect for dips. I have already posted a sour cream dip recipe.  While some part of the world is experiencing heavy snow till now, here Summer already started  and to beat the heat we are taking loads of water, cucumber, coconut water, oranges and all. Some times get bored with eating the cucumbers or salads as such. So to make it interesting and cool, i am sharing you the recipe of yogurt dip . Just try with any salads or even for tikkas. I will be sharing some summer cooler recipe here often. Stay tuned.

Yogurt Dip 

  Preparation Time : 30 mins | Cooking Time : Nil |Makes : 1 cup

     Yogurt | Curd     1 cup
     Bell pepper | Capsicum    2 tbslp (finely chopped)
     Mint leaves and Coriander leaves    1 tblsp (finely chopped)
     Chili flakes or pepper powder    to taste
     Salt   to taste
     Garlic    1/8 tsp (finely chopped)    Optional  


GreekYogurt dip
Method:
  • In a tea strainer put the yogurt and keep a bowl below it. Keep it inside the refrigerator for 30 minutes. The extra water in the yogurt  will be collected and you will get thick fresh creamy yogurt.
  • In the mean time keep the bell pepper, coriander leaves, mint leaves and garlic ready in a wide bowl. Add the creamy yogurt to this and add salt and chili flakes | pepper powder.
yogurtyogurt dip
  • Mix well. Serve with cucumber | carrot or mix this with any salads and serve chilled.
Yogurt+dip
Notes:
  1. Garlic can be avoided if you do not like the raw smell.
  2. Herbs like parsely, basil, dill leaves can also be added to this to make it flavourful. But do not add too much. Just add little.


  • Digg
  • Del.icio.us
  • StumbleUpon
  • Reddit
  • RSS

MOONG DAL BHAJIYA RECIPE | MOONG DAL PAKORAS

Moong dal Bhajiya
Looking for a interesting and easy tea time snack, then this moong dal bhajia | Pakora recipe is a perfect one for that. I happened to taste this in a friend's place during Navratri last year. Later i noted down the recipe from her but completely forget about that. When i was going through my last year's notebook, i happened to see this recipe of moong dal pakoda. So made this yesterday. It turned out very well. She didn't add onions to the recipe when she made it, but i added in the post. This pakora tasted great without onions too.


Moong dal pakora

  Preparation Time : 3 hours | Cooking Time : 20 Mins |Makes: 25

     Moong dal   1/2 cup
     Potato    1
     Green chili   2
     Ginger    a small piece
     Salt    as needed
     Coriander leaves     few
     Onion   1 (optional)
     Oil     to deep fry


Moong dal pakora
Method:
  • Wash and soak the moong dal for 3 hours. Drain the water completely after 3 hours. Meanwhile boil the potato and peel the skin and keep it aside.
Soakdrain
  • Grind this along with ginger and green chili. Do not add any water while grinding. If need just sprinkle 1 or 2 tsp of water.
  • When it is coarsely done, add the cooked potato to this.
to grindadd- potato
  • Grind this into a smooth batter. Add finely chopped coriander leaves and finely chopped onions too. Add salt.
  • Heat the oil for frying, when the oil becomes hot, keep the flame medium.
  • Spoon in the batter into the oil .
add-onionsSppon-batter
  • Cook on both sides till it become golden brown and drain it in a kitchen towel.
pakoda fryingbajji
  • Moong dal bhajjis are ready to serve. Serve with green chutney or tomato sauce.
Moong dal pakoda
Notes:
  1. If the batter is very watery add 1 to 2 tsp of rice flour to this.
  2. Ensure that you drain the water completely before grinding.
  3. After adding potatoes the batter will loosen, so do not add water.
  4. You can add finely chopped green chili instead of grinding. But since to avoid coming into the mouth while eating grinding is preferred.
  5. Instead of chili finely pound black peppers can also be added.
  6. Traditional Maharastrian bhajiyas will include coarsely pound coriander seeds too | dhaniya seeds.

  • Digg
  • Del.icio.us
  • StumbleUpon
  • Reddit
  • RSS

SWEET BEEDA RECIPE | MEETHA PAAN RECIPE

Meetha-paan
When i posted the recipe of Paan juice , i told i will post the recipe of sweet beeda too. I got the gulkand and cherries from India during my trip quick trip in February first week. Before this Chinese New year long weekend holiday here, i went to the Indian shop to buy veggies. Saw betel leaves over there and thought this will be the right time to buy this and make a post for meetha pan. Me and my hubby do not eat paan or any supari too. In our friends group all of them love paan. So we had a get together during the long weekend holidays and so i clicked this before going to the party and took it for them. Gulkand played a wonderful role in the taste of paan(as said by my friends). This video helped me in making the shape of the paan. Stay tuned for recipes using gulkand coming up in jeyashris kitchen.


Sweet Beeda

  Preparation Time : 15 mins | Cooking Time : Nil |Makes: 5

    Betel leaves | Paan Leaves     5
    Edible calcium | sunnambu     little
    Sweet Sanuf       as needed
    Gulkand       1-2 tsp
    Supari | paaku    1 tsp
    Jeera goli    little (optional)
   Cherry        few
   Jeeraga mithai    few
   Tuitty fruity    few  
   Cardamom powder      a pinch (optional)
   Tooth pick            
   

Sweet-beeda
Method:
  • Always fresh betel leaves for making beeda.  Till you start making the beeda keep this inside a bowl of water.
  • Take one from the water and pat dry it. On the back side of the leaf, slightly spread the Sunnambu . This gives colour in your tongue after you chew the paan. 
  • Do not add too much, just a little will do.
betel-leavesadd-sunnambu
  • Cut the stem of the betel leaves as shown in the picture.
  • Start folding it from one end to make a cone. My hubby helped me out for this picture.
cut -stemfold
  • Once the cone is ready start filling it with the ingredients. Keep in mind not to over stuff the cone, else you will not be able to close it. 
  • First start with supari | paaku. And then with other ingredients and lastly with gulkand.
make conegulkand
  • Close the cone and keep a cherry in the middle and insert a tooth pick in the middle.
sweet-paansweet-paan
  • Repeat this for the rest of the betel leaves.
sweet-paan
Notes:
  1. You can add dry candied ginger too inside. 
  2. Desiccated coconut also can be added .
  3. So many choices of mixed paan are availble in the market, you can stuff them inside.
  4. Always ensure not to over stuff the paan ,else it will be difficult to close it.
  5. Instead of making cone, you can just fold it and serve too. 

  • Digg
  • Del.icio.us
  • StumbleUpon
  • Reddit
  • RSS

RAGI ALOO METHI PARATHA | MILLET RECIPES

ragi-aloo-paratha
Ragi also called as Kezhvaragu in tamil | Finger millet in English , is an easily available millet everywhere. Generally my mom makes puttu with ragi and also dosai and adai too. Though i have tried these all, wanted to try something new with ragi flour. This ragi aloo methi paratha i have tried for the mangayar malar book . Ragi is an excellent source of calcium and very good diabetics. It is a very good source of iron too. You can make this as a stuffed aloo paratha too.


Ragi aloo methi paratha

  Preparation Time : 10 mins | Cooking Time : 20 Mins |Makes: 4

     Ragi    1/4 cup
    Wheat flour   1/4 flour
     Red chili powder   1/2 tsp
     Salt    to taste
     Garam masala    2 pinches
     Oil     1 tsp + to make the paratha
     Potato     1 
     Methi leaves    2 tbslp (finely chopped)          


ragi-aloo-paratha
Method:
  • Boil the potatoes and take out the skin. Adding methi is optional. You can add coriander leaves too.
  • Mash the potatoes . In a wide bowl add the ragi flour, wheat flour, red chili powder, garam masala, salt , methi leaves and mashed potato. 
  • Add little water to this and make a pliable soft dough. Add 1 tsp of oil to this and keep it covered.
ragi-aloo paratha step1ragi-aloo paratha step 2
  • Make big lemon sized equal balls. Roll one ball at a time gently by dusting this with wheat flour.
dough-balls
  • Heat a tawa and cook on both sides and add little oil | butter to the paratha.
cookcook-parathas
  • Repeat this for the rest of the dough.
  • Serve hot with plain yogurt and a pickle of your choice.
Millet-paratha
Notes:
  1. The ratio of 1:1 of ragi and wheat flour worked out well for me. If you feel it is difficult to roll add 1 to 2 tblsp extra flour while kneading.
  2. You can add mint leaves also and ajwain seeds to the dough.
  3. Potato makes the dough softer and easy to roll too. 
  4. You make into small thick parathas too.
  5. You can actually fry this as a poori too for kids.

  • Digg
  • Del.icio.us
  • StumbleUpon
  • Reddit
  • RSS

GREEN CHUTNEY FOR CHAATS AND SANDWICHES | CHAAT CHUTNEY

Green chutney for chaat 
I have already posted a version of green chutney in my Khaman Dhokla recipe, but Green chutney is a simple and no onion and garlic one, shared by a punjabi friend. This green chutney goes perfectly all Indian chaat and sandwiches. I didn't give stepwise pictures for this recipe as it is just grinding of all ingredients. Also i have another recipe for green chutney with yogurt, which can be used as a dip for paneer tikkas |kebabs too. Will post that soon.


Green chutney for chaat

  Preparation Time : 5 mins | Cooking Time : Nil|Makes: 3/4 cup

     Mint Leaves    1 cup (loosely packed)
     Coriander leaves    1/2 cup  (loosely packed)
     Ginger    a small piece
     Green chili   1-2
     Salt    as needed
     Lemon juice    1/2 tsp
     Sugar     1/4 tsp        


Green chutney for chaat
Method:
  • Grind all the ingredients together except lemon juice.
  • You can add little water while grinding. Do not add too much water. 
  • The paste should be smooth.
  • Take it out and add lemon juice and mix well. Store it in a air tight container and keep in the refrigerator. 
  • You can use this for all sandwich and for any type of Indian chaat recipes.
Check out my

  • Digg
  • Del.icio.us
  • StumbleUpon
  • Reddit
  • RSS

CORN AND SPINACH SANDWICH | CHEESY CORN AND SPINACH SANDWICH

corn-spinach sandwich
Few days back while casually talking with a friend she was telling that she made corn spinach sandwich for breakfast. I have heard about this winning combo of cor, spinach and cheese in sandwich but never tried. So wanted to try out this cheesy corn and spinach sandwich as i had all the ingredients at home. It turned out very well, clicks were not upto the level i expected but i don't want to miss posting this recipe. You can try this sandwich on weekend for breakfast or for evening snack too. Perfect snack for kids when they come back from school.


Corn and spinach sandwich

  Preparation Time : 15 mins | Cooking Time : 20 Mins |Serves: 3

     Bread slices        8
     Sweet corn *      1/2 cup
     Spinach          1/2 cup (finely chopped)
     Grated Cheese    1/4 cup
     Butter     1 tsp + to spread on the bread
     Maida | all purpose flour   2 tsp
     Milk     1/2 cup
     Salt      to taste
     Red chili flakes    to taste
     Oregano | pepper    to taste  
     Oil    1 tsp   
* I cooked the corn in pressure cooker and took the kernels out. If you are using frozen corn, just thaw it for 10 minutes and use.     
     

cheesy-corn spinach-sandwich
Method:
  • In a pan add oil and add the corn kernels and saute for a minute, add the spinach to this and cook for a minute.  Add salt, red chili flakes , oregano or pepper powder to taste.
  • Cook for a minute and put off the flame.
IMG_0698IMG_0700
  • In the same pan, add butter and add int the maida flour also. Saute in a low flame till the butter and the flour gets nicely incorporated. 
  • Add the milk and cook it in a low flame without getting any lumps. 
  • It will take 2 minutes for you to get a nice paste. Put off the flame and add it to the cooked corn and spinach mixture.
  • Add the cheese to this and mix well.
  • You can either do in the tawa or in the sandwich grill too.
  • Spread butter on the bread and spread the filling in one side of the bread. Top it with another bread and cook in a sandwich maker or tawa till the top portions become nice golden brown.
  • If you want you can serve them by cutting this into triangles.
cheesy corn spinach sandwich
  • Serve this hot .
corn and spinach sandwich
Notes:
  1. Instead of oregano and red chili flakes you can add finely chopped green chili and chaat masala too.
  2. You can skip the step of adding the maida white sauce too. Just cook the corn and spinach and add the grated cheese and go ahead.
  3. If the top portions need to browned nicely add butter nicely.

  • Digg
  • Del.icio.us
  • StumbleUpon
  • Reddit
  • RSS