Diberdayakan oleh Blogger.
RSS

ORANGE BARLEY WATER | SUMMER DRINKS RECIPE

Barley water is a very healthy drink and it a best summer cooler too. Click here to read more health benefits of barley. Few days back when Varsha was complaining of bad stomach ache due to heat i bought her tender coconut and suddenly remembered of Barley water which my mom used to give me when i was pregnant and it is best summer cooler too.Those time i have the blood pressure at a little higher level and my mom used to give barley water every day morning 1 cup at frequent intervals. It will be little horrible for me to drink the plain barley water and later she used to add Sweet lime juice but without sugar or some times less sugar. After delivery, i totally forgot about this and suddenly remebered few days back. I made this the along with fresh orange juice and added few Dried winter melonwhile cooking the barley instead of sugar. You can replace with sugar too but add little less sugar as we normally add for other juices.

Try out this easy and very healthy Orange barley juice and stay hydrated this summer and be away from the aerated drinks available in the market. 

Orange barley water

INGREDIENTS:

BARLEY 1/4 CUP
DRIED WINTER MELON 4-5 STICKS (OPTIONAL)
FRESH ORANGE JUICE 1/2 CUP- 1 CUP
WATER 5-6 CUPS
SUGAR AS NEEDED

Orange barley water

METHOD:

  • Wash the barley and cook in a wide saucepan with 5-6 cups of water till the barley becomes soft and cooked nicely.
barley water barley water
  • If adding dried winter melon add it while cooking the barley. this took 10 to 12 minutes.

  winter melon 

  • allow this to cool, discard the winter melon sticks and the barley. Take out the water and add the freshly made orange juice to this.
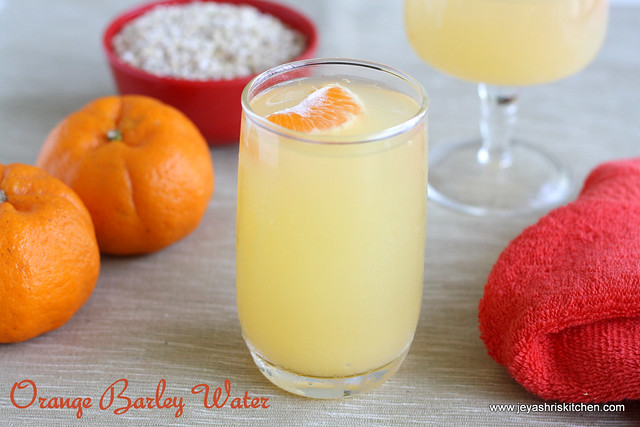
  • Mix well and refrigerate this for an hour and enjoy it cool. You can add orange segments to the juice while serving.

  Orange barley water

NOTE:

  1. You can replace Orange with lemon, water melon , cantaloupe and strawberry too.
  2. You can add butter milk  to this and salt to this to have an savoury version of barley water

  • Digg
  • Del.icio.us
  • StumbleUpon
  • Reddit
  • RSS

KALYANA RASAM |IYENGAR KALYANA RASAM

RASAM WITHOUT TAMARIND

  Kalyana rasam i recently learnt this from a friend of mine, and i was quite impressed by the taste and asked her for the recipe of this kalyana rasam. She gave me the recipe and when i asked her how you name this rasam, she told they call it as Iyengar rasam . When i was thinking how to name this rasam, Raks  suggested me name it as Iyengar Kalyana Rasam.  This rasam doesn’t include tamarind and Sambar Powder and Rasam Powder too. Now i am making this kalyana rasam almost twice in a week.

kalayana rasam 1

INGREDIENTS [SERVES 4-5]

TOMATO 2
TOOR DAL(COOKED) 2 TBLSP
GHEE 1/2 TSP
MUSTARD SEEDS 1/4 TSP
TURMERIC POWER A PINCH
ASAFOETIDA A PINCH
CORIANDER LEAVES FEW
CURRY LEAVES FEW

TO ROAST AND GRIND:

TOOR DAL 1 TBLSP
WHOLE BLACK PEPPER 1 TSP
RED CHILLI 2
CUMIN SEEDS 1/4 TSP

kalyana rasam 2

METHOD:

  • Grind the tomatoes into a puree and reserve 1/4 portion of the tomatoes before grinding.
  • Chop the 1/4 th tomatoes finely and keep them aside.
IMG_5682 IMG_5681
  • Roast the ingredients under the “TO ROAST AND GRIND” table with 1/4 tsp of ghee.
  • Add cumin in the last and switch off the flame.
  • Allow it to cool and grind it into a fine paste by adding little water.
kalyana rasam IMG_5683
  • Add this paste to the tomato puree and transfer everything to the vessel in which you are going to make rasam. Add turmeric powder, asafoetida and salt to this.
  • Allow this to boil in a low flame for 8-10 minutes.
  • Meanwhile cook the toordal and add 1 to 1 and 1/2 cups of water to the dal and add this to the boiling tomato mixture.
  • When it comes to a froth switch off the flame and garnish with curry leaves and coriander leaves.
IMG_5685 IMG_5686
  • When it is hot add the reserved ,chopped tomatoes to this and temper with  mustard seeds.
  • the tomatoes will get cooked in the hot rasam and will give a very good aromatic flavor.

  Kalyana rasam 3

Note:

  1. You can add 1 tblsp of coconut while grinding .
  2. While roasting the masala add the cumin seed in the last else it will give a bitter taste.    

  • Digg
  • Del.icio.us
  • StumbleUpon
  • Reddit
  • RSS

PANEER DO PYAZA RECIPE | PANEER RECIPES

Paneer do pyaza  is a restaurant style paneer recipe and the recipe calls for more onions and less tomatoes unlike the usual tomato based paneer recipes. When i recently visited a restaurant here i saw the name Paneer do pyaza in the menu card, though i didn’t try on that day but noted down the name and searched in net, and finally landed in Vah chef’s video which was truly awesome and tempted me to try out this one soon. I tried this twice but couldn’t get the clicks better as i expected. But still i don’t want postpone as i want to finish off posts which are lying on my drafts first and wanted to move on. So let me share the recipe of how to make Paneer do pyaza which i learnt from Vah chef's video.

paneer do pyaza

INGREDIENTS:

ONIONS 4 + 1
TOMATO 1
CAPSICUM 1/2
PANEER CUBES 1 CUP
GREEN CHILLI 3
RED CHILLI POWDER 1/2 TSP
CORINADER POWDER 1/2 TSP
TURMERIC POWDER A PINCH
CUMIN POWDER 1/4 TSP
GARAM MASALA 1/4 TSP
KASOORI METHI 1/4 TSP
OIL 1 TBLSP
SALT TO TASTE
CUMIN SEEDS 1/4 TSP
CASHEW  NUTS 1 TSP

paneer do pyaza 2

METHOD:

  • Chop 4 onions  finely and add oil in a pan.
  • Add cumin seeds and add the finely chopped onions.
  • slit the green chilli and add it to the onions.
  • Add salt and turmeric powder.
  • Saute till the onions become translucent.
IMG_5314 IMG_5315
  • Add the coriander powder, red chilli powder, garam masala and cumin powder.
  • Saute till the raw smell of the powder goes off.
  • Add little water(1/2 cup approx.) and cook for few minutes.
IMG_5319 IMG_5321
  • grind the tomatoes and capsicum into a fine paste and add it to the onion masala.
IMG_5325 IMG_5326
  • Let it cook for some time , now add the 1 onion which we have (see the ingredient list), chop it into cubes and add it to the masala.
IMG_5328 IMG_5330
  • add little water and add the paneer cubes.
  • If you want you can shallow fry the paneer cubes too.

IMG_5331-001

  • Add crushed kasoori methi leaves.
  • Add 1/4 cup of water and adjust the consistency.
  • Dry roast the cashew nuts for few minutes and coarsely powder them using a mortar and pestle.
  • Add it to the gravy and switch off the flame.
IMG_5334 IMG_5407

paneer do pyaza 1

Note:

  • The color of the gravy depends upon the color of capsicum you use.
  • Paneer cubes can be deep fried or shallow fried and added.
  • I added as it is and it tasted yum too.
  • you can add ginger garlic paste too, after adding onions in the beginning.

  • Digg
  • Del.icio.us
  • StumbleUpon
  • Reddit
  • RSS

ICE LEMON TEA | SUMMER DRINKS RECIPES

Ice lemon tea is a refreshing summer cooler and i have started having this ice lemon tea after lunch almost everyday.since i am taking on everyday basis, i never add too much sugar to this but if you are serving for guests you can add as per your taste. I tried this ice lemon tea with normal tea powder which i use for making everyday tea.

Ice lemon tea1

INGREDIENTS:

TEA POWDER | TEA BAGS 1 TBLSP | 2 TEA BAGS
WATER 4 CUPS
LEMON JUICE 3-4 TBLSP
GINGER A SMALL PIECE(OPTIONAL)
SUGAR TO TASTE

ice lemon tea 3

METHOD:

  • In a saucepan bring the water to boil and add the tea powder ( i used the “TATA” BRAND) . Let it boil for a minute and switch off the flame.
ice lemon tea tea 2
  • If using tea bags, when the water comes to a rolling boil switch off the flame and put the tea bags inside it.
  • If adding ginger, using a mortar and pestle mash it slightly and add to the water.
  • cover the lid of the saucepan and keep it aside for 20 minutes.
  • Strain the tea and add 1-2 cups of water to the strained tea as it may be strong.
  • Add lemon juice to this and add sugar.
lemon tea 3 lemon tea 4
  • Serve immediately by adding ice cubes to this.

ice lemon tea 2

Notes:

  1. You can add mint leaves to the tea when the water is boiling.
  2. Mint will give a nice flavour and will be refreshing too.
  3. Do not add too much tea powder as it will give bitter taste.


  • Digg
  • Del.icio.us
  • StumbleUpon
  • Reddit
  • RSS

VENDAKKAI PULI PACHADI RECIPE| OKRA IN TAMARIND SAUCE

Vendakkai puli pachadi recipe,i am trying out for the first time. When a reader asked for this recipe, i didn’t have much idea about how to make vendakkai puli pachadi. Though i have tasted in a friend’s place very long back, i couldn’t recollect the recipe. But thank god finally when i was casually talking to a friend about this recipe she gave me the idea and finally made it. This goes well with Arisi upma, Pidi Kozhukattai and you can have this with rice too.

Vendakkai puli pachadi2

INGREDIENTS: [ serves 2-3]

LADIES FINGER | VENDAKKAI 8-10
TAMARIND PASTE 1 AND 1/2 TSP(If using tamarind, take a small gooseberry size)
GREEN CHILLI 3
JAGGERY 1 TSP
WATER 1 CUP
RICE FLOUR 2 TSP
SALT AS NEEDED
OIL 1 TSP
MUSTARD SEEDS 1/4 TSP
TOOR DAL 1/2 TSP
METHI SEEDS | VENDAYAM 1/4 TSP
RED CHILLI 1

Vendakkai puli pachadi 1

METHOD:

  • Wash and pat dry the ladies finger. Cut them into small roundels.
  • In a pan add oil and temper with mustard seeds, toor dal , green chilli(cut into pieces),red chilli and methi seeds.
IMG_5513 IMG_5516
  • When the dal turns brown, add the cut ladies fingers. Saute in a low flame for few minutes by adding salt to this.
  • Saute this for a while but let it not change its color.
IMG_5518 IMG_5519
  • Add the tamarind extract and add turmeric powder.
  • Allow this to boil in a medium flame for 7-10 minutes in a medium low flame.
  • Add in the jaggery and let this boil for few minutes.
IMG_5520 IMG_5521
  • mix the rice flour with 2-3 tblsp of water without any lumps and add it to the pachadi.
  • Stir it nicely and keep the flame low.
  • the pachadi will get a thick consistency after adding rice flour.
IMG_5522 IMG_5524
  • Switch off the flame and serve it with arisi upma or upma kozhukattai.

Vendakkai puli pachadi 3

Note:

  1. I used the tamarind paste. You can soak a small gooseberry sized tamarind in hot water and extract juice with 1 cup of water.
  2. Do not change the color of okra while cooking.

  • Digg
  • Del.icio.us
  • StumbleUpon
  • Reddit
  • RSS

METHI THEPLA RECIPE

    I have already posted Methi Paratha recipe here but this methi thepla i learnt from my friend and i am big of this and after tasting this twice at her place, you know what i told. If you say i asked for the recipe, no- I told her whenever you make this methi thepla you give the dough for me also to make 4 rotis.Open-mouthed smileOpen-mouthed smile. Till date i didn’t try the dough on my own,(as she send me dough every week) even for this recipe too i called her home and asked her to make for me. We had a good chatting session while making this methi thepla. Thanks anitha for the wonderful recipe and making the theplas for me.
These theplas if handled in a proper way, like without touching with wet hands and not packing when it is too hot, is best suitable for travels too. So if you are planning for a summer vacation trip, you can prepare this and pack for your trip. This can stay for 2 days.
methi thepla
INGREDIENTS: [ yields 5-6 rotis]
ATTA 1 CUP
METHI LEAVES 1 CUP
PUDINA 1/4 CUP
RED CHILLI POWDER 3- 4 TSP
YOGURT 2 TBLSP
SALT AS NEEDED
OIL 1 TBLSP + OIL TO DRIZZLE ON ROTIS
CUMIN SEEDS(JEERA) 1 TSP
Methi thepla
METHOD:
  • Wash and chop the methi leaves and mint leaves finley.
  • In a wide bowl, add red chilli powder, yogurt ,oil,salt and cumin seeds.
  • Let this sit for 10 minutes.
  • Now add the atta and add the chopped methi leaves and mint leaves.
Methi thepla step 3 Methi thepla step 4
  • Mix well and slowly add little water to make a smooth dough.
Methi thepla step5
  • Keep it covered. Take out a medium lemon sized dough and roll it into a medium sized thin rotis. Heat a griddle and cook the rotis on both sides and drizzle little oil on it.
Methi thepla Methi Thepla
  • Repeat this for the rest of the dough.
Methi Thepla
Note:
  1. If planning to pack for trips, when it is completely cool, roll it in a aluminium foil with clean hands.
  2. If making in bulk ,pack in small batches.
  3. You can add or less the spiciness according to your taste.

  • Digg
  • Del.icio.us
  • StumbleUpon
  • Reddit
  • RSS